Ruckus Variator Install
This article is to prevent something like what you see here. The work is not that hard but there are steps to follow so you don't end up wrecking stuff. Tips and some unnecessary comments can be found below.

Ruckus Variator Install
This article is to prevent something like what you see here. The work is not that hard but there are steps to follow so you don't end up wrecking stuff. Tips and some unnecessary comments can be found below.

First you need to remove the drive cover with a 8mm socket. One thing to keep in mind is the cover comes off without messing with the kick-starter.
Since you do have the cover off it's a good time to clean and lightly grease the shafts on the kick start mechanism. The engagement pawl always seems to get stuck first.
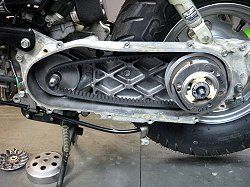
In this picture you can see the drive with the drive face (left) and clutch bell (right) removed. This allows you to remove the clutch assembly and belt, then the stock variator.
If you are only installing a variator, rollers or belt feel free to skip along to that part of the job.

We need to remove the clutch assembly from the driven pulley assembly. To do that you will need to push down on the clutch to free up the lock ring. Our Ruckus was a real bugger so I had to push down with my feet to free the lock ring. It’s not always like this but sometimes life isn’t so easy.

The clutch on this Ruckus was so tight we don’t even need to hold it down to remove the ring. Pushing on the end of the ring is the best way to remove it without messing up the splines of the driven pulley.
Remember the ring needs to be clear of the lock groove on the clutch so you can pop it out.

With the lock ring removed the clutch should spring up a bit. If it doesn’t you may need to use a socket to tap the assembly on to free the clutch. Watch your fingers. This process isn’t too dangerous but you may break a nail if you’re not careful.
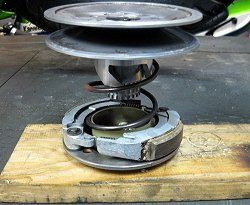
This is what the assembly will look like when the clutch is free of the driven pulley assembly.

Here you can see the stock torque driver. Now we get to the secret stuff! The Honda driven pulleys are the best design ever made. Don’t get it mixed up. The Ruckus and Metropolitan driven assemblies are over a pound lighter than “racing clutches” sold to unsuspecting scooterists. The only weakness they do have is the little hook you can see pictured here.
Over time the hook gets sharp and bites into the clutch causing the pulley to lock in a low range. Not fun.

In this picture you can see we cut the hook off so all three of the ramps are the same. You don’t need to be too precise when you cut it off so just make it look as good as you can.
Later, much later you can get fancy and take the bump out of the ramp. Ramp tuning is not for beginners but a straight, steeper ramp will keep the RPMs up.

The other secret modification we made was to take a little material off the torque driver face so the belt starts out higher. This raises the engine RPM from a dead stop by allowing the two halves to get closer together. You need to do this mod w/ a metal lathe.

Here you can get an idea of how the parts fit together. Don't forget to re-use that little metal washer below the pulley spring.
Why do we call it a pulley spring? We are working on a Japanese machine so we use the Japanese names. I don't like "contra" spring, I'm not Italian. Look, the Japanese call "Vineyards" Wine Fields! I love it. Don't get all pompous talking about scooter parts.

This is our clutch assembly with racing springs (left) and modified driven pulley assembly and racing spring (right). It’s all ready to put back together.
Notice we left out the plastic spacer from the spring. The new heavy spring is thicker, the spacer goes in the trash!
The clutch goes back on the same way it came off. Remember to aline the splines and keep the ramps properly indexed so they fit into the clutch.

To install the clutch assembly back on the scooter you will need to work the belt into the pulley with your fingers. This will make sure the belt is slack when you put everything back together.
With the belt in place you can clip the belt with an adjustable wrench or large paper clip. This step is super important. You don’t want to fight a tight belt as you finish the install. Do it like a pro and follow these instructions. Next, put the prepared assembly to the side so you can fit the speed variator.
Pros don't nick the belt with tools. I realize the adjustable wrench may not be the best choice but I was careful, nothing was forced and I was gentle.

This is our stock variator (top) and performance variator (bottom). You can see how the new variator allows the rollers to get closer to the crank, which is a good thing.
Hint: Allowing the rollers to get closer to the crank does the same for the belt. This means higher revs at takeoff.
When you install the triangle sliders onto the ramp plate make sure they are facing the correct direction. This is a common rookie mistake.

Before installing the variator this is a good time to make sure the drive boss slides freely and the movable drive face has a little grease on the bushing. Some engine oil seems to work as well. Once some belt dust gets on the boss you get a funk going and the lube becomes less important.
When fitting the variator assembly be sure to pinch the ramp tight against the rollers so they don’t fall out of place. If they do happen to fall out of place you will have to do the install twice!

Keep that thing pinched until it's all the way home. You don't want to do this twice.

With the variator on place you can fit the clutch assembly and belt. Again make sure the variator doesn’t get bumped or moved. I'm using an adjustable wrench that I smoothed all the edges on. Don't nick the belt.

Pinch the belt so you can easily install the drive face and hardware. This is the main reason we clip the belt in place. Fitting all these parts correctly is much easier if your not fighting with the belt.
Pay close attention to the splines on the drive face and kick start pawl washer. Don't get those splines crossed up.

With the nuts all finger tight you can rotate the driven pulley to take the slack out of the belt. Getting the slack out will not only keep the rollers from falling out of place but it will also keep the belt from slapping around when you first start the scoot. Next tighten the nuts and use green locktight if you are the worrying type.
You are all done. If you followed directions you also setup a killer drive unit and did it without messing up your belt or scooter. We sort of told you how to do drive mods but not really why. You can learn way more than anyone needs to know about these modifications in the CVT basics article. Until next time… it’s ti me to ride!
Your help is always appreciated to keep things running and pay for dumb ideas.