Ruckus Engine Swap Wiring

Ruckus Engine Swap Wiring

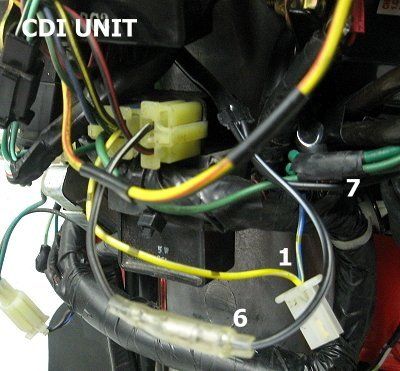
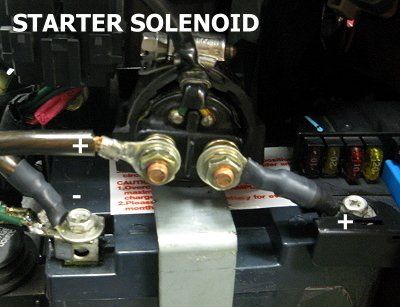
So you made the decision to install that crazy big engine in your Ruckus. This tech is setup to give you the knowledge you need to do some nice wiring so you can ride!


The Battlescooter Ruckus Swap wiring tech uses the stock harness because it makes the most sense. You can try reinventing the wheel but the stock harness is very good and keeping it is a good idea. Trying to get rid of the stock harness will only save you a pound or so. Don't get silly, save that time for your riding (^_^) Using our instruction your scoot will be fully functional and won't look like the Spaghetti monster took a dump on your scooter! You will also be able to use the stock fuel pump. The best bet is to try the stock pump then move up to a mechanical version if need be. This will assure that your Ruckus will stay as useable as the day you bought it. We believe in OEM quality, so let's get as close as possible!

Before you start hacking wires you need to keep something in mind. When you use our wiring tech it's just like replacing the head unit and speakers in a car. You aren't changing the wires, it's just what is on each end. Make sense? This is not paint by the numbers. This is a wiring concept.


To get started you need to disconnect the battery and unplug the connector from the top of the factory ECM. You will need to clip the wires in the locations shown. We are not using the factory's numbering system here. As long as you clip and use the wires in the same position and the colors are matching you are OK (^_^)


     YELLOW/RED STRIPE

    BLUE/GREEN STRIPE

    YELLOW/BLUE STRIPE

    BLUE/BLACK STRIPE

    YELLOW/GREEN STRIPE

In this picture you can see the stock Ruckus wiring already connected to our new engine. You basically cut all the Ruckus engine connectors off of the harness. The only exception is the stator wires (X) that go to the voltage regulator. You may be able to plug these in. On our motor the plug was female rather than the Ruckus male. Two males can't connect so one has to be female (^_^)


 2. BLUE/GREEN STRIPE


This wire is for the pulse coil. It gives the CDI the command to FIRE! Some engines only have one wire to the pulse coil, if that is the case on yours you have one less wire to connect.


GY6- Usually blue with a white stripe.


 3. YELLOW/BLUE STRIPE


 Pulse coil ground. Some engines have two wires leading to the pulse coil. If you engine has two you will need to connect this wire as well. If you don't have this wire say, "Yeh".

4. BLUE/BLACK STRIPE


Charge coil hot. Most likely your CDI and engine needs a hot wire. This wire comes from a charge coil on the stator. It gives about 20 volts to the CDI so it can fire at will.


GY6- Usually black with a red stripe.


X. RED/STRIPE


Most engines use a three wire plug from the stator that provide the charge for the battery and operating lights and other components. You need to connect your wires to the stock Ruckus wires leading to the voltage regulator if you want this to happen.


These wires are all big red ones on the Ruckus harness. Most Honda's or clones use yellow and some are white. It doesn't matter which wire goes to which, just make sure the stator wires go to the regulator.


GY6- Usually one white and one yellow.


Y. YELLOW


Choke hot. If your engine has an electric choke chances are it also has this wire. It's a hot lead coming directly off the stator. This wire provides 12 volts positive to operate the choke.


Z. GREEN


Ground. We grabbed the ground wire that connected to the stock Ruckus engine to run our coil. In most, if not all, cases the coil ground is chassis ground as well. You need to connect the coil ground if you want the engine to run. As you can see in the picture we used this wire to ground the electric choke as well.

1. BLACK/YELLOW STRIPE


Coil positive. This wire leads to the CDI in the front of the scoot. You use the stock Ruckus coil + but it may be nessecary to make it longer. In this case we used the #5 YELLOW/GREEN STRIPE that we cut from the ECM rather than the BLACK/YELLOW STRIPE. We had to make the wires longer so it didn't matter which wire we chose to use for the coil. 


Z. GREEN


Ground. We grabbed the ground wire that connected to the stock Ruckus engine to run our coil. In most, if not all, cases the coil ground is chassis ground as well. You need to connect the coil ground if you want the engine to run. As you can see in the previous picture we used this wire to ground the electric choke as well.

Now we are getting to the fun part. Once we have engine wired up we can connect the CDI to our harness. Remember those wires you cut? This picture shows the wire we cut from the Ruckus ECM connected to the new stuff.

Looks like a mess but it's not (^_^) Like all the pics we need to pull things apart so you can see where they go.


1. BLACK/YELLOW STRIP


We connect the coil + to the test lead hanging below the battery. This lead needs a pulse so the Ruckus ECM thinks the stock motor is in place and everything is still working correctly. Without this wire connected the ECM will shut off the fuel pump so connect it!


6. BLACK/WHITE STRIPE


This wire was black/white stripe on our aftermarket kill button. It needs to be connected to the wire of the same color on the CDI. When you push the button it grounds the wire to chassis killing the engine.


7. BLACK


This wire was black on our aftermarket kill button. It needs to be connected to chassis ground. It was the correct length to go to the battery ground plus it already had the connector so we did that.

If you decide to use an electric start some more wiring is needed. This motor has no kick so we wired in the starter. The starter motor requires that you run two heavy gauge wires from it to the battery. One wire is connects the battery to the starter or engine as a ground. The other wire connects to the positive into the starter or in some cases a starter mounted solenoid.


The solenoid for this motor is remote as you can see by the picture. The solenoid has a ground and hot lead to trigger it to crank the starter. The ground connects to the battery ground and the hot (YELLOW/RED STRIPE) wire connects to the YELLOW/GREEN STRIPE wire we clipped from the ECM in the first picture. Normally the YELLOW/GREEN feeds into the ECM to crank the motor but for a swap it needs to feed into the remote starter solenoid.


You are basically done. We left some stuff out to keep people who shouldn't attempt this from getting hurt (^_^) This tech is a basic swap wiring principal you can use on any motor for the Ruckus. Add a little extra thought and you could use this on any scooter for an engine swap. The concept is to use the old wires on your scoot that the new engine doesn't need to run things it does need. Again, if you understand this concept get clipping. If you are totally confused at this point hire a pro (^_^)

Share by: